We all know that starting out in the photography world can be exciting, but it can also be daunting, especially when you think about the equipment costs. In this guide, I’ll share some budget-friendly DIY tips that will help you kickstart your product photography journey without breaking the bank!
Essential Equipment for DIY Product Photography
Before we dive into the world of budget-friendly DIY options, let’s discuss the essential equipment you’ll need to get started with product photography. While we’re aiming for affordability, having a few key pieces of gear will significantly enhance your photography experience.
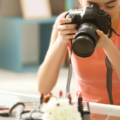
Camera Gear: Investing in a good camera is essential for high-quality product photography. While you don’t need the latest and most expensive model, having a camera with manual controls and the ability to shoot in RAW format will give you greater flexibility in post-processing.
Lens: Choosing the right lens is just as crucial as the camera itself. For product photography, a prime lens with a fixed focal length is often preferred due to its sharpness.
A 50mm or 35mm prime lens works great for various product sizes and styles.
Tripod: A sturdy tripod is a must-have for product photography, especially when you’re aiming for sharp and consistent shots. While there are cheap tripods available, investing in a decent-quality tripod will save you from potential frustrations in the long run.
Now that we have the essential equipment covered, let’s move on to the exciting DIY options!
DIY Product Photography tips
1. Natural Light
Before you rush out to buy expensive studio lighting, let’s not overlook the free and abundant resource right outside your window – natural light! Find a well-lit area in your home, like near a large window or a glass door, and set up your product there. Soft, diffused light coming through the window creates a natural and flattering look for your subjects.
Remember, the key is to avoid harsh shadows, so you might need to play around with the positioning of your product.
2. DIY Light Reflectors
When working with natural light, using reflectors can help bounce light onto the shadowed side of your product, reducing harsh shadows and creating a more balanced exposure. Don’t worry; you don’t need to buy expensive reflectors.
Grab some white foam boards or even tin foil attached to cardboard, and you’ve got yourself a budget-friendly reflector.
3. Reflective Surfaces
To add a touch of professionalism to your images try using using mirrors or an acrylic sheet as a reflective surface. Lay down your base backdrop, then place the acrylic sheet on top. Alternatively, experiment with mirrors for a distinctive reflection.
Be sure to clean the reflective surface thoroughly to remove any smudges or fingerprints!
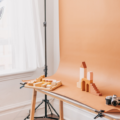
4. Backgrounds
Plain bedsheets and fabrics, like tablecloths or curtains, can be excellent backdrops for your product photography. Experiment with different textures and colour to find the perfect backdrop for each product.
To style them, lay the fabric flat and create gentle folds for added texture.


Conclusion
DIY product photography equipment provides a budget-friendly solution to capture top-notch product images without overspending. Focus on essential equipment: a good camera, prime lens, and sturdy tripod. Embrace natural light and DIY reflectors for beautiful results. Experiment with reflective surfaces and diverse backdrops for added creativity.

0 Comments