
My first render in Blender was bad. And I mean really bad. Not “needs a few tweaks” bad, but “why does this look nothing like what I imagined” bad. The frustrating part is that I had a photography background. I understood light. I knew how to shoot a product and make it look beautiful in real life. But the moment I sat down in Blender I forgot all of that and started treating lighting like a technical checkbox rather than a creative decision.
That disconnect is exactly why your renders are not matching your moodboard, and if you have ever wondered why your Blender lighting looks flat compared to the references you saved on Pinterest, you are in the right place. This is not a software problem. It is a mindset one.
You already know more than you think
Here is the thing about lighting in Blender. It works the same way it does in real life. The size of a light source affects how soft or harsh the shadows are. The strength of a light affects the contrast in the scene. The position of a light determines where the shadows fall and how the product is shaped by them. These are not Blender concepts, they are photography concepts. If you have ever shot a product near a window and noticed how the light changed depending on the time of day, you already understand the fundamentals. You just have not applied them here yet.
The reason most beginners struggle with lighting in Blender is not because they do not understand light. It is because they forget to think like a photographer the moment they open the software. Blender feels technical so they approach it technically, clicking through settings and adding lights without stopping to ask what they actually want the scene to feel like.
Start with the shadows, not the lights
When I want to recreate a lighting mood from a reference image, the first thing I do is look at where the shadows are falling. Not the lights themselves, the shadows. Shadows tell you everything. They tell you how many light sources there are, roughly where they are positioned, how strong they are, and what kind of mood the scene is going for. A harsh shadow with a sharp edge means a small, strong light source close to the subject. A soft, barely there shadow means a large, diffused light source further away.
Once I have a rough idea of the shadow direction I use that to position my three point lighting setup, key light, fill light, and rim light, and then I go in and add or adjust from there. It is not about recreating the reference exactly. It is about understanding the logic behind it so you can make informed decisions rather than guessing.


Mood is a feeling, not a setting
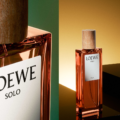
The other reason renders rarely match inspiration boards is that beginners focus on individual settings rather than the overall feeling of the scene. Luxury product renders feel the way they do not because of one specific light setting but because of the combination of soft shadows, warm colour temperatures, and careful contrast between light and dark. Energetic, high contrast renders feel the way they do because of strong directional light and minimal fill.
Before you place a single light in your scene, ask yourself what you want the viewer to feel when they look at this render. Calm and premium? Bright and playful? Bold and editorial? That answer should inform every lighting decision you make, from the strength of your key light to whether you use a warm or cool colour temperature. Think like a photographer first. Then open Blender.
The gap closes faster than you think
The distance between your moodboard and your renders is not as big as it feels right now. It is not a technical gap, it is a perceptual one. Once you start looking at reference images with the same eye you would bring to a photography shoot, asking where the light is, where the shadows fall, and what mood the scene is communicating, everything starts to click into place.
If you want to build that foundation properly, my post on three point lighting is the best place to start. It gives you a repeatable framework you can apply to any product scene and build from.
And if you are ready to take your lighting further, I have a full post on light linking in Blender which is one of the most useful tools for getting precise control over exactly what your lights affect in a scene.
Come and find me on TikTok at @lollypix for regular Blender tutorials and behind the scenes content!


0 Comments